Wednesday, 30 November 2011

Updated Gant Chart

Here is my updated gant chart up to the current point. It didn't take me six weeks to complete my teaser trailer, poster and magazine drafts, but I did use a lot of the time organising everything in the summer holidays. I have now completed my final versions which only took 3 weeks to plan and complete even though I re-filmed my trailer, most likely because most of the organising had been done for my draft versions and I only had to make changes to my draft poster and magazine. I am now at the point where I need to start my evaluation to meet the final deadline.

(please click to enlarge)

Tuesday, 15 November 2011

Audience Feedback- Final Versions

To gain further audience feedback for my final versions, I used the same technique of having my audience write on a post it not giving good and bad comments on my teaser trailer, poster and magazine cover. Here are the results I got:

Teaser Trailer Final Version Feedback


Poster Final Version Feedback


Magazine Cover Final Version Feedback


Monday, 14 November 2011

Final Magazine Cover

Final Film Poster


Final Teaser Trailer

Making My Final Magazine Cover

 I started changing my magazine by acting on my audience feedback from my drafts. I moved the layout about according to people's opinions which I feel works a lot better. The cover line is now on the image giving it a more obvious relation to the image. I also make the circle flash smaller which makes it look better, but it left me with a gap.

Therefore I added another sell line "Horror Special..celebrating the best and the worst". This appeals to the film magazine genre and also the cover image, making this issue a horror special. This also would encourage the audience to read the magazine. I highlighted "best" and "worst" in red keeping to my colour scheme and making them stand out. 

I then also changed the colour pattern on this list of films to red and grey because I felt I didn't have enough balance of white and grey on the cover.

Making My Final Poster

I started to create my final poster by changing the colour balance of the image. I made the colours cooler which I felt appealed more to the horror genre by making it look scarier and also linking well to the plot of my film because they are in a cold environment. 

This is what the image turned out to look like.

I then got an image of TV interference and pasted this over the image. I took down the transparency to make it look like this was camera distortion, appealing to the found footage genre.

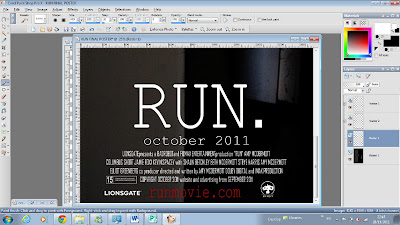
I then needed to add institutional logos and a rating. I got the Lionsgate Logo, Bad Robot logo and a 15 film rating box in black against a black background and exported these in to custom paintbrushes. This then meant I could use them as a paintbrush tool so I could place them where I liked in whatever colour I wanted with no background.

This is what they looked like once I had placed them in appropriate places. I feel that this really added to the realistic look of the poster. 

Making My Final Teaser Trailer


I started my teaser trailer with a green band. I imported an image that I saved from online of the green band and extended the clip to an appropraie time for it to remain on screen. Using my video converter, I took the Lionsgate logo sequence from YouTube and made it in to a AVI file which I could then put in to the timeline. I took out the sound but kept the clip and then put the ambience sound effect over this.


I used the blade tool to cut the whispering part of the opening clip apart from the bit where I reached down to sort out the camera. I then removed the video just to keep the sound and made this a blank clip to create this part of the script. I continued the ambience as backing music. As you can see I faded in the whispering slightly so it didn't start so suddenly. The ambience clip also ended to I cut the beginning part out just to keep the echoing sound and cross faded the repeated sound clip with the previous so they flew nicely between each other. 


I then used the blade tool again to separate the beginning of the first shot. This was so I could use the Bad TV filter just on this part, to look like the clip was fuzzing in. I used this technique throughout my trailer so only certain parts fuzzed not the whole clip which wouldn't have worked.


I changed the settings on the bad TV filter to make the clip look exactly how I wanted it to. 


I also used the same filters I used in my draft teaser trailer to create the night vision effect. However I made the effect less green which I think made it look a lot better. I applied these settings to the rest of my clips to keep a consistent style.


In my teaser trailer draft, I didn't like how the titles continuously fuzzed. Therefore I used the blade tool to cut the text clips in to sections and then apply the bad TV effect to random parts to create the interference/fuzzing . I then also added the louder, brief interference sound effect when I had used the bad TV filter, adding to the effect. I kept the noise filter throughout the title to make it look like there was still interference but not as much when the bad TV effect is used which I thought worked really well.


Here is my next clip where I also used the blade tool to cut a separate part and use the bad TV filter on it. This worked as a good transition between the titles. As you can see I have also used a cross dissolve transition to make the titles fade in which I feel make them more interesting and build tension. I have also continued the ambience as you can see in the sound timeline underneath.


Here is where I created the "at least 16,000 disappear forever" title. In my teaser trailer draft I just had "forever" fade in separately and fuzz like the other titles, but I don't think this made it stand out enough. So here I used the cross dissolve transition to make forever fade in underneath the first part of the title. 


I then used the noise filter as "forever" stays still on the screen for a while. I used the blade tool to cut a separate clip and then used the bad TV effect to make it really fuzz and ten disappear. I also added the loud interference sound here to add the effect. 


Before I showed the final shot, I wanted the screen to be blank for a small amount of time to create suspense. Again I used the blade tool too separate the clip and removed the video but kept the sound. I used a cross dissolve sound transition because the whispering appeared very suddenly. I then also used the blade tool to cut a separate clip and use the bad TV filter to make the clip fuzz in. 


I then also used the blade tool again to cut up the clip and make random sections have the bad TV effect which I thought worked really well and made the shots much more interesting than in my draft trailer. 


As the shot ended I placed the first scream in again which can be heard over a blank screen. 


I then added more screams and overlapped them until I was happy with how they sounded. 


Again I then used the blade tool to divide the title up to add the bad TV effect just to parts.


As you can see here I then used the cross dissolve transition to make the release date fade in underneath RUN. I then made run fade out for the release date to remain on screen by itself.


I then used the bad TV filter and noise filter to make the release date pixelate and fade out. I think this looked really good and worked a lot better than in my teaser trailer draft.


I then added my institutional references and website. I made the website red by using the text editing features. As you can see here I carried on the ambience sound right to the end. I used the blade tool to cut a seperate clip at the end where I used the bad TV effect to made this title fuzz out. I again used the louder interference sound to add to this effect.




Final Filming - Behind the Scenes

Here are some photos from behind the scenes at the final filming. Below you can see the camera set up, location and actors whilst I was filming:


Camera set up on tripod for first shot


View from behind the camera 


Putting on costumes


Getting ready in the hallway for final shot


Filming using the tripod


Adjusting the position of the camera to get the right shot


Filming of the final shot

Organisation of New Costumes for Final Filming

I didn't feel that my previous costumes worked as well as I wanted them to in my draft filming. Here are some shots of the costumes I put together for my final filming. I chose warm clothes that would be suitable for winter such as coats and scarves as I felt this would add to the feel of the film as horror films are often set in cold environments. I also added a costume for myself as I changed my script so I would be in the first shot (see script for teaser trailer - final version).


Organisation of New Equipment for Final Filming

I didn't feel the filming for my draft trailer was high quality enough, so for my final filming I am going to use a Panasonic HD handheld camera. I wanted to use a handheld camera for my trailer to create realism as this is the genre of my horror film, like the Blair Witch Project, Paranormal activity and so on.
I have also changed my script and the first shot requires a tripod. I wanted to use a good quality tripod that would give a good still shot and not fall over when I go to grab the camera (see final script). This is a photo of the tripod set up before filming


To edit my final trailer I am going to use Final Cut again as I felt this worked very well for my draft version


Again I am going to use this programme on my Mac


To create my final poster and magazine cover I am going to use Paint Shop Pro as this worked well for my draft versions


I am going to use this software on my Asus laptop again

Free Asus Laptop

Organisation of New Sounds

Now I have written my new script and got some audience feedback I have found some more sounds to add to my final teaser trailer:


This is the sound I will play throughout my teaser trailer. I feel it's not too obvious and the droning/rumbling/echoing sound really appeals to the horror genre. Found footage genre teaser trailers don't really use music, the a subtle scary sound like this one. I feel that this will really work well for my teaser trailer.


I am going to use this sound for when "forever" remains on screen still for a while and then fuzzes out. I feel by adding a louder interference sound the effect will work better and make it more obvious when it cuts out.


This is the sound I am going to use for when they are all waiting in silence and they hear one of the creatures schreech. This sound isn't really a screech it's more of a roar, but it is still really appealing to the horror genre. I chose this sound because I liked how it echoed and also sounded as if it was in the distance, which would mean it will fit in really well with my script.